

🍕 What is Redux & definition of state
Redux is a state management system for cross-components or app-wide states. We can divide the definition of state into three main types:
Local State 🔸 It is a state that belongs to a single component, such as a toggle state. It is managed internally from the component with useState() or useReducer().
Cross component state 🔸 It is a state that influences several components, such as a button that triggers a modal overlay that can be opened from a button somewhere and closed by another button within the modal. useState() or useReducer() can manage such behaviour by using props.
App-wide state 🔸 It is a state that influences all components of an application, such as user authentication, where the navigation bar shows more options after logging in and other components are updated.
🌮 Redux vs React Context
React Context is an integrated feature that also allows us to avoid prop chains by creating a context provider component that manages the state. However, it has some potential disadvantages that might not affect the development of the app. It is important to note that the app is not limited to one type of state management, but both can be used in the same application. Typically, only one is used for the wide state of the application, and React Context can still be used for selected multi-component states, which are important in parts of the application.
React Context Disavantages
- It does not work well in a complex set-up 🔹 It depends on the size of the application, but may not be a problem for small or medium-sized applications. However, in large applications with various states that affect multiple components and many context providers, a developer could end up with deeply nested JSX code.
- Performance 🔹 According to a member of the React team, the use of useContext is great for low-requency updates (change of theme, authentication, etc.), but it is not great when the data changes a lot, so it is not a replacement for a Flux-like state propagation. Redux, on the other hand, is a Flux-like state management library, and useContext is not a good replacement for it.
(Here is a link if you would like to know more about Flux Architectural Pattern)
🥞 Redux in theory
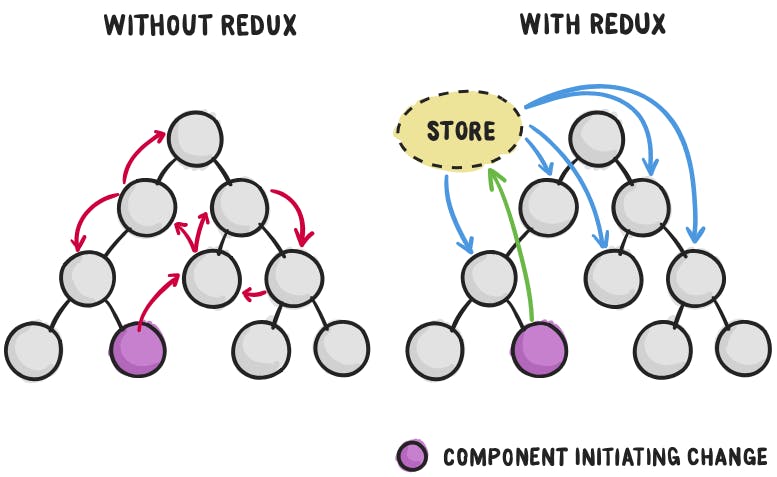
The main objective of Redux is to create a Central Data Store responsible for managing the states for the entire application. Indeed, in this store, it is possible to handle all the cross-component states such as authentication, theming, user inputs, etc. The data contained in the store can be used in the components, and if some data changes, the component can react accordingly and update the UI. To do this, the components subscribe to the central store, and when the data changes, the store will notify the components.
How components change data in the store
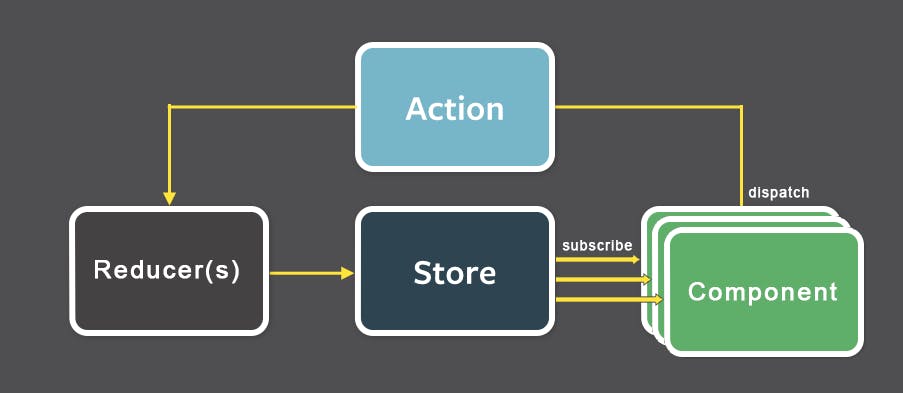
Components never manipulate the store data directly. Basically, components have direct access to store data through subscription, but there is no direct data flowing in the other direction. Instead, the reducer functions, which need to be set up, are responsible for mutating the store data (the term reducer already indicates a type of function that takes some inputs, transforms the inputs and returns a new result).
Actions are used to trigger a reducer function, and instead of directly accessing the store, components can dispatch these actions. The action is then forwarded to the reducer, which reads and performs the description of a desired operation. The reducer returns a new state that replaces the existing state in the Central Data Store. Finally, when the state is updated, all subscribing components are notified so they can update the UI.
🥐 Installing Redux
The following instructions can be found on the official Redux website.
"The recommended way to start new apps with React and Redux is by using the official Redux+JS template or Redux+TS template for Create React App, which takes advantage of Redux Toolkit and React Redux's integration with React components."
# Redux + Plain JS template
npx create-react-app my-app --template redux

# Redux + TypeScript template
npx create-react-app my-app --template redux-typescript
"The Redux core library is available as a package on NPM for use with a module bundler or in a Node application:"
# NPM
npm install redux

# Yarn
yarn add redux
🌭 Basics of Redux before real practice
Now we play with Redux to understand its mechanism.
After creating a new JS file in the app (I called it redux-demo.js), it is possible to import the createStore function from Redux and use it to create our store.
import {createStore} from 'redux';

const store = createStore();
The createStore function requires an argument, which is the reducer and is needed to produce a new state snapshot. The reducer is also executed with a default action that should return the initial state.
// Giving state a default value of {counter: 0}
const counterReducer = (state = {counter: 0}, action) => {
    return {
        counter: state.counter + 1
    }
};

const store = createStore(counterReducer);
When creating the reducer function, two parameters must be included, the old state and the dispatched action. Moreover, it must always return a new state object. Therefore, the reducer function is a "pure function," which means that the same input values should always produce exactly the same output and there should be no side effects inside such as HTTP or local storage requests.
const counterSubscriber = () => {
    const latestState = store.getState();
    console.log(latestState)
};

store.subscribe(counterSubscriber);
Redux is made aware of the subscriber function by subscribing to the store and passing the subscriber function itself as an argument.
.getState() returns the latest state snapshot after being updated, so it runs after the state changes.
store.dispatch({type: "increment"});
The dispatch is a method that dispatches an action. The action is a JS object with a type property that acts as an identifier and is usually a unique string.
Try running the following code on the terminal with the command node [file name].js (in my case node redux-demo.js ) :
import {createStore} from 'redux'

const counterReducer = (state = {counter: 0}, action) => {
    return {
        counter: state.counter + 1
    }
};

const store = createStore(counterReducer);

const counterSubscriber = () => {
    const latestState = store.getState();
    console.log(latestState)
};

store.subscribe(counterSubscriber);

store.dispatch({type: "increment"});
(If you receive "SyntaxError: Cannot use import statement outside a module" just add "type": "module" to the package.json)
On the terminal you should now be able to see:
{ counter: 2 }
The counter is increased with initialization and again when the action is dispatched.
Although everything works, this is not the behaviour Redux expects, as the main objective is to do different things within the reducer for different actions. It is therefore time to use the second argument of the reducer function, the action.
import {createStore} from 'redux'

const counterReducer = (state = {counter: 0}, action) => {
    if (action.type === "increment") {
        return {counter: state.counter + 1}
    }

    if (action.type === "decrement") {
        return {counter: state.counter - 1}
    }

    return state;
};

const store = createStore(counterReducer);

const counterSubscriber = () => {
    const latestState = store.getState();
    console.log(latestState)
};

store.subscribe(counterSubscriber);

store.dispatch({type: "increment"});
store.dispatch({type: "decrement"});
If we run the file again, the result should be:
{ counter: 1 }
{ counter: 0 }
When initializing, the reducer returns the original state, after which the state is incremented and decremented by the dispatch functions, leaving the counter at 0.
🍝 React + Redux in practice
Implement Redux in an existing application.
Since Redux is not react specific but can be used in any JavaScript project, we will also use a second package called react-redux.
This package includes a component to make the store available to the entire app, as well as a pair of custom hooks, useSelector and useDispatch that allow components to interact with the store.
// In the terminal
npm i redux react-redux
More information can be found at the official website.
By convention, it is common to create a folder called store and place all the Redux related files in it. Then I create a index.js file, but you can call it as you wish.
Let us create a simple counter, as we have done before, and export the store variable to provide the components of the app:
// src/store/index.js

import {createStore} from "redux"

function counterReducer(state = {counter: 0}, action) {
    switch (action.type) {
        case 'increment':
            return {counter: state.counter + 1}
        case 'decrement':
            return {counter: state.counter - 1}
        default:
            return state
    }
}

const store = createStore(counterReducer)

export default store
In the src/index.js file, which is at the top of our app tree and where we render the entire app, we import:
import {Provider} from "react-redux";
With the we can wrap the , and pass our store to store the Provider's store prop.
// src/index.js

import React from 'react';
import ReactDOM from 'react-dom/client';
import './index.css';
import App from './App';
import {Provider} from "react-redux";
import store from "./store";

const root = ReactDOM.createRoot(document.getElementById('root'));
root.render(<Provider store={store}><App/></Provider>);
Using Redux data in React components
To gain access to the store data from the components, we can import useSelector or useStore hooks from the react redux library. The first is really convenient because it allows us to extract certain variables from the store. However, the react-redux documentation suggests that you prefer useSelector in general:
useSelector: When an action is dispatched, useSelector() will do a reference comparison of the previous selector result value and the current result value. If they are different, the component will be forced to re-render. If they are the same, the component will not re-render.
useStore: This hook should probably not be used frequently. Prefer useSelector() as your primary choice. However, this may be useful for less common scenarios that do require access to the store, such as replacing reducers.
The useSelector hook accepts a function that determines which piece of data we want to extract from the store, so the counter variable, as it is the only one present. By using this hook, react-redux creates a subscription to the Redux Store for the component, so that it is updated automatically every time the data changes.
import classes from './Counter.module.css';
import {useSelector} from "react-redux";

const Counter = () => {
    const counter = useSelector(state => state.counter)

    return (
        <main className={classes.counter}>
            <h1>Redux Counter</h1>
            <div className={classes.value}>{counter}</div>
        </main>
    );
};

export default Counter;
Dispatching actions from the components
To dispatch actions from within the component, react-redux provides another hook called useDispatch . When calling the hook, no arguments are needed, as it only returns a function that can send actions when executed. In the execution of the function, it is now possible to provide an object that contains the type associated with an action to update the counter.
import classes from './Counter.module.css';
import {useDispatch, useSelector} from "react-redux";

const Counter = () => {
    const dispatch = useDispatch();
    const counter = useSelector(state => state.counter);

    const incrementHandler = () => {
        dispatch({type: "increment"});
    };

    const decrementHandler = () => {
        dispatch({type: "decrement"});
    };

    return (
        <main className={classes.counter}>
            <h1>Redux Counter</h1>
            <div className={classes.value}>{counter}</div>
            <div>
                <button onClick={incrementHandler}>Increment</button>
                <button onClick={decrementHandler}>Decrement</button>
            </div>
        </main>
    );
};

export default Counter;
Attaching payloads to Actions
Until now, we have seen how to send simple actions, but sometimes actions can also have an additional value called payload. In the dispatch function, except the type, we are allowed to add and name other values as we like. Let us create a new case scenario for the reducer function, which expects an additional value, called amount.
// src/store/index.js
function counterReducer(state = {counter: 0}, action) {
    switch (action.type) {
       ...
        case 'increase':
            return {counter: state.counter + action.amount}
        ...
    }
}
In the component we can create a new handler to dispatch this new action with the additional "amount" value and pass it to a new button.
// Component

import classes from './Counter.module.css';
import {useDispatch, useSelector} from "react-redux";

const Counter = () => {
    const dispatch = useDispatch();
    const counter = useSelector(state => state.counter);

    [...]

    const decrementHandler = () => {
        dispatch({type: "decrement"});
    };

    return (
        <main className={classes.counter}>
            <h1>Redux Counter</h1>
            <div className={classes.value}>{counter}</div>
            <div>
                <button onClick={incrementHandler}>Increment</button>
                <button onClick={decrementHandler}>Decrement</button>
                <button onClick={increaseHandler}>Increase by 3</button>
            </div>
        </main>
    );
};

export default Counter;
Working with multiple global states
The counter state may not be the only global state we want to handle. Let us therefore add a new toggle state to practice our counter with several global states. When adding a new state, we also have to deal with it in the other case scenarios, otherwise we risk overriding other state variables and breaking the app.
function counterReducer(state = initialState, action) {
    switch (action.type) {
        case 'increment':
            return {...state, counter: state.counter + 1}
        case 'decrement':
            return {...state, counter: state.counter - 1}
        case 'increase':
            return {...state, counter: state.counter + action.amount}
        case 'toggle':
            return {...state, showCounter: !state.showCounter}
        default:
            return state
    }
}
Inside the component, select the new ShowCounter state and add it to the JSX logic:
import classes from './Counter.module.css';
import {useDispatch, useSelector} from "react-redux";

const Counter = () => {
    const dispatch = useDispatch();
    const {counter, showCounter} = useSelector(state => state);

    const toggleCounterHandler = () => {
        dispatch({type: "toggle"})
    };

    const incrementHandler = () => {
        dispatch({type: "increment"});
    };

    const increaseHandler = () => {
        dispatch({type: "increase", amount: 3});
    };

    const decrementHandler = () => {
        dispatch({type: "decrement"});
    };

    return (
        <main className={classes.counter}>
            <h1>Redux Counter</h1>
            {showCounter && <div className={classes.value}>{counter}</div>}
            <div>
                <button onClick={incrementHandler}>Increment</button>
                <button onClick={decrementHandler}>Decrement</button>
                <button onClick={increaseHandler}>Increase by 3</button>
            </div>
            <button onClick={toggleCounterHandler}>Toggle Counter</button>
        </main>
    );
};

export default Counter;
🥨 Redux Toolkit
Redux Toolkit is a library that helps developers work with Redux and prevent errors. The package is intended to be the standard way to write Redux logic, and therefore deserves its own section. You can find out more at the Redux Tollkit website.
Installation:
# NPM
npm install @reduxjs/toolkit

# Yarn
yarn add @reduxjs/toolkit
The Redux library can be removed from package.json as it is already included in reduxjs/toolkit.
createSlice
This function allows developers to create different slices of the global state. This is useful if we have different states that are not directly related, such as the authentication and the counter state. In addition, we can create slices in different files to have a more manageable code. createSlice accepts an object as an argument in which we can add both counter and showcounter logic as they are related.
Each slice needs a name, an initialState and a reducers object. The latter contains methods, and each method has a name and receives a copy of the latest state. Such a structure allows developers to stop writing the if / case check, reducing the length of the code and making it more readable.
Unlike the previous reducer method, we are now allowed to mutate the state, or at least it seems! In fact, Redux Toolkit and the createSlice function cannot accidentally manipulate the existing state, because Redux Toolkit uses internally another package called Immer, which clones the existing state, creates a new state object, saves all unedited states and overrides the ones we edit in an immutable way (see more). This functionality makes the work of developers much easier and safer, as we no longer have to worry about rewriting states for each method over and over again. When a payload is needed, we can also accept the action parameter and use it within the method.
This is how our newly created slice looks:
import {createStore} from "redux";
import {createSlice} from "@reduxjs/toolkit";

const initialState = {counter: 0, showCounter: true}

const counterSlice = createSlice({
    name: "counter",
    initialState,
    reducers: {
        increment(state) {
            state.counter++
        },
        decrement(state) {
            state.counter--
        },
        increase(state, action) {
            state.counter += action.amount
        },
        toggleCounter(state) {
            state.showCounter = !state.showCounter
        }
    }
});
Connecting Redux Toolkit State
In our case, we can simply pass the counterSlice.reducer as an argument of the store, and it would work:
const store = createStore(counterSlice.reducer)
However, if we have multiple slices, we can use the standard Redux function combineReducers or even better the configureStore function provided by Redux Toolkit. configureStore is a substitute for createStore but it makes merging reducers easier. It accepts a configuration object as an argument in which it expects a reducer property. The reducer property can accept a single reducer or, if the app has multiple slices, an object that contains all reducers to be merged.
const store = configureStore({
    reducer: counterSlice.reducer
})

#OR

const store = configureStore({
    reducer: {counter: counterSlice.reducer}
})
Dispatching
createSlice automatically creates identifiers for all reducers, and to access them, we can simply select them from our sliceName.actions. We can now use the methods created by Redux Toolkit, which, when called, creates action objects that already have a type property with a unique identifier per action. As developers, we therefore no longer have to worry about creating action objects and unique identifiers or avoiding typos. Now we can export all the actions at the bottom of the file:
import {configureStore, createSlice} from "@reduxjs/toolkit";

[...]

const store = configureStore({
    reducer: {counter: counterSlice.reducer}
})

export const counterActions = counterSlice.actions
export default store
Going back to the Counter component we can import these actions and refactor our code accordingly:
import {useDispatch, useSelector} from "react-redux";
import {counterActions} from "../store";

const Counter = () => {
    const dispatch = useDispatch();
/* Change useSelector(state => state)
 to useSelector(state => state.counter) */
    const {counter, showCounter} = useSelector(state => state.counter);

    const toggleCounterHandler = () => {
        dispatch(counterActions.toggleCounter())
    };

    const incrementHandler = () => {
        dispatch(counterActions.increment());
    };

    const increaseHandler = () => {
        dispatch(counterActions.increase(3));
    };

    const decrementHandler = () => {
        dispatch(counterActions.decrement());
    };

    [...]
And another small change to the increase reducer, where the amount now becomes by default payload:
increase(state, action) {
            state.counter += action.payload
        },
Example of multiple slices
When adding more slices to a React application, there is the risk of creating an excessively long file. It might be worth splitting it into smaller pieces and creating a file for each slice created.
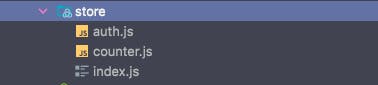
// store/index.js

import {configureStore} from "@reduxjs/toolkit";
import counterSliceReducer from './counter'
import authSliceReducer from './auth'

const store = configureStore({
    reducer: {counter: counterSliceReducer, auth: authSliceReducer}
});

export default store;
// store/counter.js

import {createSlice} from "@reduxjs/toolkit";

const initialCounterState = {counter: 0, showCounter: true};

const counterSlice = createSlice({
    name: "counter",
    initialState: initialCounterState,
    reducers: {
        increment(state) {
            state.counter++
        },
        decrement(state) {
            state.counter--
        },
        increase(state, action) {
            state.counter += action.payload
        },
        toggleCounter(state) {
            state.showCounter = !state.showCounter
        }
    }
});
export const counterActions = counterSlice.actions;
export default counterSlice.reducer
import {createSlice} from "@reduxjs/toolkit";

const authInitialState = {isAuthenticated: false};

const authSlice = createSlice({
    name: "auth",
    initialState: authInitialState,
    reducers: {
        login(state) {
            state.isAuthenticated = true
        },
        logout(state) {
            state.isAuthenticated = false
        }
    }
});

export const authActions = authSlice.actions
export default authSlice.reducer
Do not forget to fix the small import errors after refactoring the code!
🍭 Links
⚜️ Thanks to Maximilian Schwarzmüller, you can find his React course here.
⚜️ Find the complete code on my GitHub.
⚜️ Connect with me on LinkedIn.
⚜️ Or follow me on Instagram if you are curious about my life!
If you liked the content, please leave some likes 🤙❤️ or unicorns 🦄
Pietro Piraino 🐈⬛🇮🇹🍕